Tuesday, October 30, 2007

Squash Macaroni and Cheese

I consider this dish an adult, sophisticated version of the classic Mac-n-Cheese. I got the recipe from my friend Madelyn, and it is a winner! The orange-yellow color comes from squash. You can use any squash, but pumpkin or butternut squash work very well. It's creamy and satisfying while being packed with extra nutrition.


Squash Macaroni and Cheese

1 pound whole grain elbow macaroni: boiled until tender but still firm
2 pounds squash or 2 10-oz packages frozen pureed squash
1 1/2 to 2 cups milk
6 ounces of shredded cheese (a variety of favorite melting cheeses works nicely)
1/2 cup to 1 cup ricotta cheese
1 teaspoon salt
1 teaspoon Dijon mustard or mustard powder
dash of picante sauce (optional: my addition)
Parmesan or other cheese for topping

If using fresh squash:
1. Preheat oven to 400 degrees F. Slice squash in half and place face down on a greased pan and bake about an hour, until the squash is tender. An alternative for faster cooking: peel, seed and cube squash and coat with oil and bake for 20 to 30 minutes until tender.
2. Puree the cooked and peeled squash with 1 1/2 cups of milk in blender or food processor. Add to a large saucepan and simmer on low until heated. If it is too thick, add more milk, a 1/2 cup at a time. Salt and pepper to taste. Remove from heat and stir in the ricotta cheese, starting with 1/2 a cup, and tasting to see if you want to add more. Stir in the mustard and optional picante sauce. Stir in some of the shredded cheeses, reserving enough for topping. Adjust oven temperature to 375 degrees F. Proceed to step 3 below.

If using frozen squash:
1. Preheat oven to 375 degrees F.

2. Place the frozen squash and two cups of milk in a large saucepan and simmer over low heat, stirring occasionally, breaking up the squash as it defrosts. Once the squash is defrosted and heated, blend either with an immersion blender or in a blender if the mixture isn't smooth enough. But, if it is smooth enough already, skip that step. Add the ricotta, mustard and picante sauce (if using) and stir in some of the cheese, reserving enough for topping.

3. Combine the squash sauce with the cooked pasta and place in a greased baking pan. Top with cheese. Bake for 20 minutes or until cheese is melted, and it is hot and bubbly. Turn up the heat or turn on the broiler to for a few minutes to crisp and brown lightly, if desired.


Note added November 2007: be sure to check out Madelyn's blog, Karma-Free Cooking.

Monday, October 29, 2007

Two sandwiches

We are so enjoying sampling the nice variety of breads that we made at the bread baking class we took over the weekend. We find we can't decide which breads to have with our meals, as we want them all! So, for lunch, we decided to use two of the breads. We made peanut butter and banana sandwiches with the Spent Grain Loaf and cream cheese cucumber sandwiches with the Vollkornbrot. A nice thing about whole grain breads is that they stay fresh for a nice length of time. They actually taste better and better.

Here are some interesting notes about the breads:
The Spent Grain Bread is made using the grains left over from brewing beer. The Vollkornbrot is 100% rye. The dark color comes from cocoa powder and molasses.

Sopa de Elote (Mexican Corn Soup)

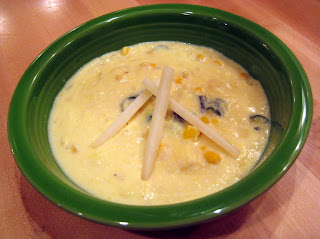
Sopa de Elote is so comforting and delicious. And it is surprisingly easy and quick to make. Above is a version we were served at Fonda San Miguel, a restaurant in Austin, Texas. It is garnished with thin strips of fried corn tortillas. Below is a version I made at home using mostly white corn, but also some yellow corn, so the color is much lighter. I garnished mine with thin strips of Gruyere cheese.


Sopa de Elote (Mexican Corn Soup)

  • 4 1/2 cups fresh raw corn kernels (husked from approximately 8 or 9 ears), divided
  • 1/2 cup to 1 cup milk
  • 1 tablespoon olive oil
  • 3 tablespoons minced onion
  • 2 cloves garlic, minced
  • 1/2 of a poblano chile, stem removed, seeded and chopped (optional)
  • salt and pepper to taste
  • strips of cheese or fried strips of corn tortillas for garnish (optional)
  1. In a blender, blend 3 cups of the corn kernels with 1/2 cup of milk. Set aside.
  2. In a pot, heat the oil and fry the onion and poblano chile until tender.
  3. Add the blended corn mixture and the rest of the corn kernels. If the soup is too thick, add extra milk, a little at a time, until desired consistency is reached.
  4. Heat at medium low until it simmers, then reduce heat to low. Stir occasionally. Simmer uncovered until well heated, and the corn is tender. Season with salt and pepper. Garnish as desired.

Sunday, October 28, 2007

Making Country Miche Boules

Here I am showing some of the steps involved in making the High Extraction Flour Country Miche Boules we baked in the Wheat to Eat class at Johnson & Wales. After making the dough and letting it rise for its first rise, the dough is formed into the boule (round loaf) shape and is placed in a highly floured banneton (a basket made of willow), where it rises a final time.

Above we have flipped four of the boules out of their bannetons onto a floured peel (wooden board). The reason for placing them on the peel is that it makes it easy to slide them into the oven. Before going into the oven, the tops of the loaves are scored. Note, due to the time limitations of the class, we couldn't wait for them to rise to their prime. They would have benefited from about fifteen more minutes of rising time. But they still turned out plenty beautifully.

Here we have placed several dozen loaves of bread into the oven. During the first five minutes, steam is produced by the special ovens. On the racks in front are loaves (shaped into batards) that are ready to enter the ovens. They are not waiting on peels, but rather on parchment lined sheet pans, an alternative. Chef Reinhart gave us tips on how to adapt the baking methods to home ovens.

The boules are shown baking in the oven above. They have risen slightly more in the oven, and the score marks have become quite expanded. I like how the flour from the bannetons leaves pretty white flour stripes on the top of the bread.

Chef's Choice Baking Class

This weekend, DH and I attended a bread baking class at Johnson & Wales in Charlotte, NC. The class was called "From Wheat to Eat: Flavorful Whole Grain Breads" and was taught by Peter Reinhart, the author of several baking books. We loved the class and had a great time. Above Pedro is standing next to Chef Reinhart as he is signing our copies of some of his books.

Here I am standing near Chef Reinhart as he is explaining the process of creating a soaker and its role in whole grain bread baking.

Here we are rolling out dough for whole grain crackers.

This is the bounty of bread we brought home from the class. Clockwise from top left, Spent Grain Loaf, Vollkornbrot Loaf, High Extraction Flour Country Miche Boule, Whole Wheat Mash Batard, and in the bowl are Three Seed Crackers. I can't even come close to picking out my favorite. I love them all! And a bonus, not pictured, is that we were able to bring home some 100% whole wheat starter and some 100% rye starter.

Wednesday, October 24, 2007

Mustard Roasted Potatoes and Veggies


Here's another dish for which to thank Madelyn. The original recipe is for Potatoes Poupon, but I think that this variation is really great, as there is no limitation to using Dijon Mustard. Madelyn says that other varieties of mustard, such as grain mustard, also work great. And my addition to the recipe is to add a variety of vegetables, rather than just using potatoes. In the photo above, I used red skinned potatoes, yellow zucchini and carrots.


Mustard Roasted Potatoes (and optional veggies)

3 tablespoons Dijon, grain or your favorite gourmet mustard
2 tablespoons extra virgin olive oil
1 or 2 cloves garlic, minced
1/2 teaspoon Italian seasoning
2 pounds red skinned potatoes (about six medium) cut into chunks OR 2 pounds total of potatoes and veggies cut into same sized chunks
salt and pepper to taste

1. Preheat oven to 425 degrees.
2. Mix together all of ingredients except the potatoes and veggies in a bowl. Add the chopped potatoes and veggies and toss to coat. Season with salt and pepper.
3. Lightly grease with olive oil a roasting pan. Add the coated veggies. See photo below.
4. Bake 35 to 40 minutes, stirring occasionally, until tender.


Tuesday, October 23, 2007

LynnH's Pumpkin-Vanilla Loaf (vegan)

Now that it is fall and pumpkin season, I absolutely must recommend Lynn H's Pumpkin-Vanilla Loaf recipe. It is a vegan recipe with few ingredients, and yet it has so much flavor! Also, it's amazingly moist. The recipe calls for Kamut Brand flour which adds some of the flavor. However, I have also had success using a combination of whole grain flours, such as spelt and barley. Instead of using sugar, I have had success sweetening as follows: 1/2 cup (heaping) of maple sugar (not syrup) plus 3 tablespoons agave nectar. Bake at 335 instead of 350 if you use my sugar substitute.

Also note that the recipe is for two loaves, but my loaf pan is large, so I put all of the batter in my one pan and it turns out great. In my oven it look 50 minutes to bake the one large loaf.

Maple Vanilla Carrots

Here is another recipe that my friend Madelyn recommended I try. It's very easy, but gives the carrots an unexpected and sophisticated flavor. The original recipe was featured in a magazine. I am presenting the recipe as Madelyn described it to me.

1 pound of carrots, sliced 1/4 inch thick on the diagonal, so they look pretty
1 vanilla bean
maple syrup
unsalted butter
salt and pepper to taste

1. Place the carrots in a deep skillet with a small bit of water, enough so the carrots will be able to steam.
2. Slice the vanilla bean in half and scrape the seeds into the carrot pan. Put the vanilla bean pod in the water as well. Season with salt and pepper.
3. Cover and simmer over medium heat until the carrots are cooked and most of the water has evaporated. Drain any excess water. Remove the vanilla bean pod. The tiny seeds will remain on the carrots.
4. Add a tablespoon of butter and a tablespoon of maple syrup to the carrots. Stir so the butter melts and the syrup coats everything. Madelyn suggests adding a bit of honey if more sweetness is desired.

Serve and enjoy! Note that I placed the split vanilla pod on top as a garnish, but it's for presentation only, not for consumption!
Posted by Picasa

Monday, October 22, 2007

Madelyn's Spinach Crepes

Hello everyone, sorry it's been so long since I've posted anything. My friend Madelyn that I met at the Conscious Gourmet cooking class in April sent me some wonderful recipes. She said I could share them here. This recipe is for a filling for savory crepes, and it is so delicious!

Madelyn said she picked up some pre-made crepes at the supermarket. So it was very easy to make this dish, just warming the crepes and folding them around the filling like a burrito. I have never seen pre-made crepes before, but I haven't looked either. So, I made my own using this recipe, substituting a mixture of whole grain flours for the white flour. They didn't turn out very thin, as I don't have a proper crepe pan, but the taste was great. I found that there was enough filling for eight crepes.

Madelyn's Spinach Crepes

1 tablespoon olive oil
1 leek, sliced and rinsed well
1/2 of a green bell pepper, diced
2 to 4 cloves garlic, depending on how much you love garlic
1 small container of fresh mushrooms, sliced (my addition to the recipe: it's optional)
1 teaspoon tarragon or Italian seasoning
salt and pepper
1 package of frozen spinach, no need to defrost, OR one bag of fresh spinach
a bit of half and half mixed with a bit of condensed cream of mushroom soup OR 2 heaping tablespoons sour cream OR cream cheese
shredded Swiss, Gruyere or Sharp Cheddar cheese
chopped walnuts to add inside or to garnish
agave nectar or honey to garnish: optional

1. Heat the oil in a saute pan. Add the leeks and green pepper and saute until tender. Add the garlic and mushrooms and saute until the mushrooms are tender (if using them). Season with salt and pepper and herbs. Add the frozen or fresh spinach and stir until defrosted or wilted. Add the cream of choice, a tablespoon at a time, until you get a nice sauce for the vegetables.

2. Prepare crepes or warm pre-made crepes. To each crepe, add a few tablespoons of filling, some shredded cheese and some walnuts to the center of a crepe. Fold over the edges in the way a burrito is folded. Place, seam side down on a hot griddle to get the crepe to stay folded and to melt the cheese inside. Turn carefully to warm a few seconds on the opposite side. Then serve, optionally drizzled with honey or agave nectar.

Variation: Here's a thought: you could substitute the crepes for flour tortillas. Assemble and prepare exactly the same otherwise. They would be Spinach Quesadillas instead of Spinach Crepes.

Sunday, October 7, 2007

Black Bean Mole Enchiladas

The other day I made a pot of spicy black beans using a combination of ingredients I hadn't used before with blacks beans. The result were some delicious beans with a very flavorful sauce. DH insisted that the beans tasted incredibly similar to mole and that the sauce even had the color of mole. Below is shown a bowl of the beans, garnished with Mexican queso fresco and freshly made corn tortillas.

DH suggested using the leftover beans and tortillas to make Yucatecan-style enchiladas de mole. We strained the spicy broth from the beans so we could fill the enchiladas with the beans and top them with the sauce. It was a great vegetarian substitution for the traditional chicken filling. See the top photo. Unfortunately I don't know if I'll ever be able to recreate the beans, as I have no idea what I put in them! I was just tossing things in the pot.

The way we made and presented the enchiladas is the way enchiladas are commonly served in Yucatan. The only difference is that in Yucatan, shredded chicken is the most common filling. Also, many people use bottled mole (such as Dona Maria brand) rather than making mole from scratch. So, a super easy way to make these enchiladas would be to use bottled mole and canned beans. Assemble as follows:

Easy Vegetarian Black Bean Mole Enchiladas

1. Layer plates with lettuce.
2. Heat mole according to package's directions. Heat some black beans. Warm some corn tortillas so they are pliable.
3. Put a few spoons of beans in the center of each tortilla and fold two opposing sides over the center to form an enchilada with two open ends.
4. Lay the enchiladas on top of the lettuce as shown in photo, as many to a plate as you want per serving.
5. Top the enchiladas with the mole.
6. Garnish with toasted sesame seeds, chopped cilantro, blanched minced onion, and crumbled queso fresco. Serve.
Posted by Picasa

Saturday, October 6, 2007

Blueberry Cornmeal Pancakes

I love breakfast. Less than a year ago, we started a tradition in my house of eating a leisurely, freshly cooked breakfast every day. Every day. I am not at all exaggerating. My husband has to commute across town to get to work, and I am amazed he gets to work at all for the amount of time we take on breakfast these days. I find that when we are traveling, I get extremely grumpy if I am deprived of our morning ritual. The continental breakfasts at hotels just don't cut it. My days of eating cold cereal or grabbing a piece of peanut butter toast to eat on the fly are over. Below Pedro and I are eating a fantastic breakfast at Magnolia Cafe in Austin. We ordered the cornmeal pecan and the gingerbread nut pancakes and two sides of fruit. We traded plates aftering eating some, so that we were both able to sample both types of pancake.

Magnolia Cafe's pancakes have been on my mind since we got back to Florida. So, this week I made blueberry cornmeal pancakes. They are pictured in the top photo.

Blueberry Cornmeal Pancakes
adapted from Cafe Flora Cookbook
makes 8 large or 16 small

1 cup cornmeal (either regular or blue cornmeal)
1 cup flour (or a mixture totaling one cup of a combo of whole grain flours - I used 1/2 cup spelt and 1/2 cup barley)
2 teaspoons baking powder
1/2 teaspoon baking soda
1/2 teaspoon salt
1 tablespoon maple syrup or agave nectar or honey
2 large eggs
1 1/2 cups buttermilk or milk
1 tablespoon fresh lemon juice (omit if using buttermilk)
2 tablespoons walnut oil or melted butter or oil of choice
1 cup blueberries (or nut variation, see below)
butter or oil for greasing griddle

variation: instead of adding blueberries you could add instead 1/4 cup (or up to 1/2 cup) of chopped pecans or other nut)

1. In one bowl, whisk together the wet ingredients. In another bowl combine the dry ingredients.
2. Sift the dry ingredients into the wet ingredients. Fold the ingredients together until just combined. Don't over mix. Gently fold in the blueberries or nuts.
3. Heat a griddle until hot over medium high heat. Grease well. Pour batter onto skillet, up to 3 tablespoons each for small or more for larger pancakes. Cook until bubbles form and the sides are beginning to set, then flip and cook 45 seconds or until cooked through. Grease griddle between pancakes if necessary. Keep warm in a 200 degree oven covered with damp towel while finishing cooking the entire batch. Or use warming burner on stove top.
4. Serve with butter or maple butter and/or maple syrup.
Posted by Picasa

Friday, October 5, 2007

Babaganoush

I have been wanting to post a recipe for baba ganoush, but I have found it's a very hard dish to photograph. So, this photo will have to do. I wish I had garnished it with at least some paprika or parsley, but that's hindsight. Anyway, it is a dish I make regularly, so if I ever get a better photo, I'll post it here.

Babaganoush
(Eggplant Dip)

1 large or 2 small eggplants, roasted and peeled
2 to 4 cloves of garlic, roasted with the skins intact, then peeled
salt
juice from 1 lemon
1 tablespoon tahini (ground sesame paste) - optional
a few tablespoons extra virgin olive oil
optional garnishes: chopped parsley, paprika, kalamata olives, extra olive oil

1. Roast the eggplant and garlic. There are a several methods, chose your favorite. For example, you can use a grill to cook them until tender. Or you can bake them in the oven. There are several ways to do this. Some people say to bake the eggplant whole (uncut and unpeeled) in a 400 degree oven for an hour. Then set aside and cover with a towel for about 15 minutes and then peel using your fingers. I don't normally do it that way. I prefer to peel and then chop them into 2 inch cubes before cooking them. Then I place them and the garlic cloves on a baking sheet greased with olive oil, stirring to coat the pieces with the oil. I line my baking sheet with a Silpat mat as to need minimal oil. I season with salt and bake for about 30 minutes or up to 45 minutes if needed, until tender, stirring occasionally.

2.Remove papery skins from garlic cloves. Put eggplant, garlic, lemon juice and tahini (if using) in a food processor. Turn on and pour olive oil, one tablespoon at a time into the top of food processor so it drips in as it is running. Stop and scrape down sides and taste from time to time. Add only as much olive oil as necessary to get a nice texture and flavor, to control the calories. Season with salt as necessary.

3. Garnish to your liking and serve as a dip with pita bread, carrot sticks or other veggies. It is also good as a spread in sandwiches.

Wednesday, October 3, 2007

Quinoa Stuffed Tomatoes

In Kansas City at the Blue Bird Bistro I ate Quinoa Stuffed Heirloom Tomatoes, above. I was surprised by the dish, as it was served cold, the tomatoes were uncooked. The cooked and cooled quinoa was mixed with chopped fresh herbs, shredded cucumbers and carrots, and probably other ingredients, but I can't recall. It was refreshing and summer-like.

At the farmers market the end of last week, I found orange tomatoes, which I don't usually see there. I still had a few left, plus some red ones, so I decided to try stuffing them. Other ingredients I had picked up at the market that I still had on hand were leeks, red onion and a red bell pepper, so I used those and peas with Inca Red Quinoa for my filling. Other ingredients would also have been good in the mixture: shredded carrots, sliced green onions, chopped green bell peppers, zucchini, etc. Really the possibilities are endless. I baked the stuffed tomatoes, as I was wanting a warm dish to ward off the stormy weather here.

Quinoa Stuffed Tomatoes
hot or cold

1 cup Inca Red Quinoa (or regular or a mix of the two)
1 cup water
1 cup vegetable broth
1 tablespoon olive oil
1 leek, sliced and minced and washed well
1/2 a red bell pepper, minced (or green, etc)
1/2 a small red onion, minced (or other type)
1 cup frozen peas (or other veggie)
salt and pepper
4 to 8 tomatoes
shredded cheese, optional

1. Rinse the quinoa well in a fine mesh strainer. Heat a skillet and stir the wet quinoa around in the dry skillet until the quinoa dries and slightly toasts.
2. Heat the water and broth to a boil in a saucepan, add the dry quinoa and simmer on low, covered, for about 15 minutes.
3. Heat the olive oil in the skillet. Add the leeks, onion and pepper (and optional additional vegetable) and saute until tender. If using frozen peas, stir them in after the other veggies are tender. Salt and pepper to taste. Add the quinoa and stir to combine. If the quinoa still has some liquid, simmer the mixture until most of the moisture evaporates.

If you want a cold dish:

Let the filling cool. Core and carefully slice the tomatoes into quarters without cutting all the way through to the bottom. Spread the sections open and using a spoon, scrape out some of the seeds. Fill the opening with the quinoa mixture and serve at room temperature or slightly cold. See first photo above for presentation.

If you want a hot dish:

Core the tomatoes without cutting all the way through the bottom, leaving complete intact bowls. Carefully, scrape out as much of the inside pulp and seeds as possible. Stuff the tomatoes with as much of the quinoa mixture as you can, careful not to break the tomato bowl. Place the stuffed tomatoes on a greased baking pan. Optionally sprinkle shredded cheese on top. Bake at 400 degrees until the tomatoes are tender, but still hold together. See picture below.

Tuesday, October 2, 2007

Chayote Tomatillo Casserole

This dish was inspired by a dish I was served at Mr. Natural in Austin. I was served chayote squash with corn that had been simmered in a tomatillo based broth. Chayote is a small squash that is sized and shaped like a pear and is bright green.

2 chayotes, cubed (no need to peel; skin and seeds are edible, but some people prefer to peel)
2 small sweet potatoes, peeled and cubed
2 ears of corn, husked, kernels removed from cobs
12 small tomatillos or one pint, papery skin removed
handful of fresh cilantro, chopped (reserve some for garnishing)
2 or 3 cloves of garlic
half of an onion
1 poblano chile
up to 1 cup of water or vegetable broth (if needed)
salt and pepper

Roast the tomatillos, onion, garlic and poblano on a comal (griddle) on a burner or in a hot oven. Turn occasionally to roast evenly. After roasting, Remove papery skin from garlic and remove stem and seeds from poblano. Blend in a blender with most of the cilantro. If it doesn't blend easily, add water or vegetable broth, bit by bit, until it blends into a sauce.

Place the vegetables in an oiled roasting pan and pour the tomatillo sauce on top. If there is not enough sauce to coat everything, add water or vegetable broth bit by bit, stirring until everything is nicely distributed. Season with salt and pepper. Roast in oven at about 425 degrees for at least 30 minutes, or until the vegetables are tender. Stir from time to time.

Garnish with chopped cilantro. It would also be good with a bit of Mexican crema (cream) or a dollop of sour cream.

[Alternative: I baked this in the oven. But, I think this dish could also be simmered on the stove if you make the sauce more brothy, by adding the whole cup of broth, or even a bit more than that. Bring the sauce to a nice simmer, add the veggies and simmer at a low heat, stirring occasionally, adding more water or broth if it gets too dry.]

Monday, October 1, 2007

Almond Butter French Toast with Baked Pears

First of all, Happy World Vegetarian Day! We started the day off with a terrific breakfast. I love to make French Toast when we have crusty rustic bread that is starting to go stale. We topped the toast with baked pears, above and with baked apples, below.

Baked Pears or Apples

1. Heat oven to 375 degrees.
2. Cut pear in half and remove stem and seeds. Core apple.
3. Place fruit sections, peel side down, on a lined baking sheet. Drizzle them with maple syrup and sprinkle with cinnamon.
4. Put in the oven and bake while preparing the French toast. The fruit will be done about the same time as the toast. Check for tenderness by piercing with a fork. See below.


Almond Butter French Toast

1. In a large shallow bowl whisk the batter ingredients:

1 egg
1 tablespoon almond butter
1 teaspoon maple syrup, agave nectar or honey
1/4 cup milk
pinch of salt
dash of vanilla

2. As shown below, dip the pieces of rustic bread in the batter to coat.

3. Toast each side of the bread pieces on a buttered griddle. Serve with the baked fruit.

Picnic at the Beach

It is nice to be back in Florida after all the traveling we've done lately. So, we decided to take a little picnic to the beach. Unfortunately there is red tide here right now, so we didn't actually go too close to the water and risk getting itchy throats. But, we still had a nice picnic near the beach on Amelia Island. There is a very nice bakery on Atlantic, between downtown and the beach at Fernandina on the island. It is called Chez Lezan. We purchased a boule of their sourdough to eat with our picnic. It had a super thick, crunchy crust and soft tasty interior. Yum! It went well with our salads of red pepper, orange tomatoes, lettuce, walnuts and queso fresco (a salty, crumbly Mexican cheese).

For dessert we peeled some Asian pears. So juicy and sweet!

Our unexpected bonus was the nature walk we took at Egans Creek, where we were able to photograph some roseate spoonbills napping on a tree. Maybe we just hadn't been to the right places before, but this was the first time in nine years in Florida that we've seen any.