Wednesday, November 28, 2007

Lemon Curd Breakfast Topping

As you know by now, I am a big fan of breakfast. So, here is a recipe for lemon curd, which is great on everything breakfast: crepes, scones, pancakes, French toast... Yes, it is a bit indulgent, but for a treat once in a while, why not?! Here is a great article about lemon curd on the Fine Cooking website. It has a link to a recipe they recommend, but here is my adaptation:

Lemon Curd
yields about 2 cups

6 tablespoons unsalted butter, softened (or just cut into small cubes if using a stand mixer)
2/3 cup of maple sugar (or sweeten to taste with crystal sugar of choice, up to one cup)
3 large eggs
2/3 cup fresh lemon juice
1 teaspoon finely grated lemon zest

1. With a hand mixer or stand mixer, beat the butter with the sugar until fluffy, about two minutes. Add the eggs one at a time, beating. Once well incorporated, add the lemon juice and mix to combine. Don't worry how it looks at this point.
2. In a heavy saucepan, heat the mixture at low heat, stirring until the mixture is smooth and then thickens, about 15 minutes. Don't allow the mixture to boil.
3. Remove from heat. Add the zest and transfer to a bowl. Place plastic wrap to touch the top of the curd so a skin doesn't form. Refrigerate. It will thicken a bit more in the refrigerator. After it is cooled, cover tightly and it will keep a week refrigerated or 2 months in the freezer (if you can resist it... )

Barley Risotto with Greens

This dish is adapted from a recipe appearing on page 45 of the November/December Vegetarian Times. The published recipe is "Barley Risotto with Spinach and Tofu." In that issue there are several risotto recipes that do not call for Arborio rice, which is what is normally used for risotto. This recipe calls for quick-cooking barley, but I didn't have enough on hand to make the complete recipe, so I used a mixture of barley and rice. Also, since I had on hand some beautiful organic mixed greens from my CSA veggie basket, I substituted them for the spinach. So I steamed the greens separately before adding them to the dish. And I omitted the tofu.

I found that it took much much longer to cook than the recipe says, and that I needed much more hot broth/liquid than the recipe called for as well. But perhaps if I had used the stated amount of barley instead of a combination of rice and barley, it may have cooked more in line with the recipe. In any event, the flavors are delicious, so it is worth sharing.

Barley Risotto with Spinach and Tofu, adapted from Vegetarian Times
Serves 6

six cups of vegetable broth (or more, as needed)
2 cups quick-cooking barley
2 tablespoons olive oil, divided
3 large shallots, chopped or one cup chopped red onion
2 cloves garlic, chopped
2/3 cup dry white wine or sherry cooking wine
1/2 cup sun dried tomatoes, chopped (and drained if oil packed)
12 oz fresh baby spinach or if substituting fresh greens: steam, squeeze out excess water, then chop
1 8 oz package baked garlic-herb tofu, cubed (optional)
3 tablespoons grated Parmesan cheese (plus more for garnish, if desired)
3 tablespoons chopped fresh chives or 1 tablespoon chopped fresh sage

1. Put the broth in a pot to boil, then keep simmering on the back burner.
2. In a medium-hot dry skillet, toast the barley, stirring often, about five minutes. Set aside.
3. In a heavy pot, heat one tablespoon of the oil and saute the shallots or onion for about 4 minutes, stirring often. Add the garlic and the toasted barley and stir about 2 minutes. Add the wine and simmer for about 3 minutes or until the liquid is almost all absorbed.
4. Add 1/2 cup of the hot broth and the sun-dried tomatoes and simmer about 4 more minutes or until liquid is mostly absorbed, stirring constantly. Add fresh spinach a few handfuls at a time and cook until wilted. Continue adding the hot broth about 1/2 cup at a time, stirring until mostly absorbed and then keep repeating: add broth, stirring until liquid is mostly absorbed, then adding more broth... If using steamed greens instead of fresh spinach, stir them in bit by bit.
5. When the barley is just about tender, add the cubes of tofu (if using) and chives or sage and heat through and let the flavors blend. Then, stir in the shredded cheese and remaining tablespoon of olive oil.

Tuesday, November 27, 2007

Karma-Free Cooking

I just wanted to be sure to let everyone know that my friend Madelyn now has a vegetarian cooking blog, Karma-Free Cooking. I have previously posted on my blog several of her delicious recipes. She and I took a cooking class together in the Spring through Conscious Gourmet. Anyway, check out her blog!

Papa a la Huancaina

I do hope all of the Peruvians will excuse me for taking liberties here with one of the Peru's national dishes. The way I present the dish in the photo above is not quite authentic.

As a part of our Thanksgiving festivities this year, DH and I went to a party at some friends' house where there were people from all over Latin America. Many people brought dishes to share, and the result was a very interesting feast, with a wide variety of authentic, native American dishes, none of which happened to be dishes that are traditionally eaten for Thanksgiving! There were many Peruvians at the party, so of course, there were Papa a la Huancaina. Papa means potato in Spanish.

Our friends kindly gave me some aji chiles, as I expressed interest in wanting to try to make the dish at home. I am sorry I didn't take a photo of the aji chiles, but they are bright, deep orange and look similar in shape and size to banana peppers but are very spicy. They can sometimes be found in bags in the freezer section of Latin American specialty grocery stores.

The recipe below was given to me years ago by a classmate in one of my Spanish classes, who got it from her Peruvian mother-in-law.

Papa a la Huancaina

2 tablespoons oil
2 aji chiles, seeds removed or 1 jalapeno, seeds removed (or more chiles depending on how spicy you like it)
2 cloves garlic
4 oz queso fresco or feta cheese
4 soda cracker squares for texture (I admit I omitted them but still liked the results)
1 cup milk or half-and-half or evaporated milk, or amount needed for sauce-like consistency
salt and pepper to taste

Blend in blender the first three ingredients to make a nice paste. Then add the cheese and crackers and pulse to combine. Keep blending and pour in the milk, bit by bit, until blended into a sauce of a nice consistency.

Hard boil eggs. Boil potatoes and sweet potatoes until tender. Slice the eggs and potatoes. Arrange the eggs and potatoes and some olives on a lettuce-lined platter. Pour the cheese sauce on top and serve.

Note: in the photo above, I roasted potatoes, onions and butternut squash instead of boiling potatoes and sweet potatoes. I also admit that I roasted the aji peppers and garlic before blending them into the sauce, with great results. And, I topped my dish with ground toasted pumpkin seeds, as my own personal touch.

Tamales Dzotobichay

What does a vegetarian make for Thanksgiving? Well, at my house, our tradition is to imagine what the Pilgrims would have eaten at a feast if they had landed on the shores of Yucatan, being that is where DH is from. It's all part of living in a multi-cultural household. This year we made a very old Mayan dish called Dzotobichay, which means chaya tamales. Chaya is a dark leafy green vegetable similar to chard or collard greens and is native to the Yucatan. I have never found it in the States, and in any case, I find it rather harsh, being unaccustomed to it. So I substitute whatever greens I can find for the chaya in making these tamales: spinach, kale, collard greens, chard, etc.


For the first time, DH and I decided to try making the masa (tamale dough) from scratch, rather than using a dry instant masa flour mix like Masa Harina. This isn't going to be a recipe, but I am at least going to describe the process of making it. In the photo above, I am bringing a pot of hominy to a boil. The white cloudiness in the water is cal, slaked lime. The cal is essential to get the hominy to become soft enough to grind into the masa dough. In any event, I boiled the hominy for a short time and then set it aside to soak. After it soaked, I rinsed it well to remove all traces of cal and rubbed the hominy with towels to dry and to clean them.


We put the hominy in a grinder, pictured above, and ground it into masa. We decided to make the masa more indulgent than we normally do, being that it was Thanksgiving. So, we whipped pure butter, added the ground masa and beat it together, adding enough hot vegetable broth to make a moist dough. Salted as needed. Then we stirred some chopped, steamed greens into the dough.

These tamales are made using banana plant leaves, rather than corn husks. The banana leaves impart a flavor to the dough as it cooks. The dough is spread on the banana leaf and is topped with chopped boiled eggs, ground pepita (toasted pumpkin seeds) and salsa de jitomate. The banana leaf gets wrapped around the filling into a little bundle and the bundle is steamed for at least an hour to cook.

Here are some links that show more about the process of making fresh masa and making banana leaf tamales:

Vegetarian Banana Leaf Tamale Recipe

Masa Dough for Tamales and Tortillas

Friday, November 9, 2007

Turnips Au Gratin

I got some turnips with my basket of vegetables this week from my organic CSA farm. I was going to put them into a soup, but at the last minute, I was inspired to make them into a cheesy casserole along with a sweet potato. I served it with Agave-Glazed Tempeh and my Mixed Greens and Walnuts.

Turnips Au Gratin

3 turnips, cubed
1 sweet potato, peeled and cubed
2 tablespoons of butter
1 tablespoon olive oil
1/4 cup flour
2 cups milk, warm
dash of picante sauce (optional)
salt and pepper
grated cheese
whole grain bread crumbs

1. Preheat oven to 350F.

2. Boil the turnips and sweet potato until tender, about 20 minutes. Save one to two cups of the water they boiled in. Drain the rest of the water. Set aside.

3. Melt the butter with the olive oil in an oven-proof pot. Add the flour and stir until smooth. Add milk and stir continuously until the sauce thickens.

4. Add the tender turnips and sweet potatoes and stir to combine. Add the reserved water from the turnips. Stir. Season with salt and pepper and optional dash of hot sauce.

5. Top with grated cheese and bread crumbs. Bake uncovered until the cheese melts and the bread is toasty, about 25 minutes.
Posted by Picasa

Tuesday, November 6, 2007

Mushroom Sandwich on Ciabatta

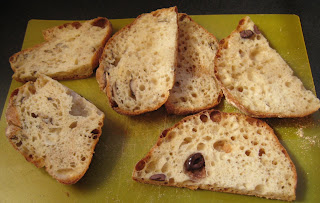
We are still enjoying the variety of breads from our recent bread classes. We made some shitake mushroom and some black olive ciabatta breads which are great for pressed or baked sandwiches. Below you can see the structure of the ciabatta bread with the pieces of mushroom or olive inside. We didn't put much of either in the dough. Next time we will put a bit more.

We could have cooked our sandwiches in a sandwich press. But this time, we baked them on a pizza stone in our oven at 350 degrees until the crust became crisp and the cheese melted. The filling is Swiss cheese with sauteed onions, garlic, herbs and mushrooms.

Mixed Greens with Walnuts

This week, my vegetable basket that I received from my CSA farm was filled with a wonderful variety of greens. So, I made a saute using a mixture of them and walnuts. Cooked greens are not especially photogenic, but if I wax poetic enough about how tasty they were would you believe me? The greens we had this week were Tatsoi, Red Russian Kale, Wasabi Spicy Lettuce, Arugula and Turnip Greens. I used a bit of each. I adapted this recipe from one that appeared in the Natural Gourmet Cookbook.

Mixed Greens with Walnuts

Up to two pounds total of a variety of greens, washed well, coarse stems removed
1 tablespoon extra virgin olive oil
4 cloves of garlic, minced
sea salt to taste
1/2 cup walnut pieces
freshly grated nutmeg

1. Toast the walnuts in 350 degree F oven for about 10 minutes, stirring once, until fragrant.
2. Boil the washed greens a large pot of water for about 10 minutes, uncovered. Drain. Spin in a salad spinner to remove excess water. Chop roughly when cool enough to touch.
3. Heat the olive oil in a saute pan. Add the garlic and saute briefly to flavor the oil. Add the greens and saute for about 5 minutes. Season with salt and freshly grated nutmeg. Stir in the walnut pieces. Serve.

Variation for ginger lovers: I think a nice addition would be to add about 1/2 teaspoon minced fresh ginger root at the same time as the garlic.

Sunday, November 4, 2007

Making Fruit-Filled Ciabatta

One of the breads we made at The Art of Artisan Bread Class at Johnson & Wales was Cranberry Raisin Pecan Ciabatta. Here are some photos showing some of the steps in making it. Above is the very wet ciabatta dough, just as it has begun to hold together.

Here the fruit and nuts have been mixed into the dough. Notice how densely packed it is!

Here the dough is shaped and ready to go into the oven.

The bread is being loaded into the oven. We have been enjoying it with butter for breakfast for the last few days.

When the artisan breads come out of the oven the crusts have a beautiful crunchiness. Eventually though, the crusts will soften. We prefer to eat the bread when the crusts are crisp.

To revive and re-crisp the crusts of artisan breads:

preheat oven with a pizza stone inside to 350 degrees F. Place the bread on the pizza stone and bake for about 8 to 10 minutes. The inside of the bread will stay soft while the outside will crisp. Enjoy!

Artisan Bread Class at Johnson & Wales

For the second weekend in a row, DH and I have attended a bread baking class offered through the Chef's Choice program at Johnson & Wales in Charlotte, NC. This class was The Art of Artisan Bread which lasted eight hours, over two days. It was taught by Chef Harry Peemoeller. Pictured above are a sampling of the fabulous breads we made during the class. At the top is Ciabatta with Cranberries Raisins and Pecans. Below that is Sourdough with Onions. Below that from left to right: Ciabatta with Shitake Mushrooms, Ciabatta with Black Olives, a Sourdough Boule and three Baguettes with three different shapes. At the bottom are Multi-Grain breads, one shaped in a boule, and the other in a loaf.

Above is a tray of freshly baked sourdough and fruit-filled ciabatta. The sourdough was made with 100% wild yeast. The focus of the class was on the slow fermentation method of baking bread. We prepared the doughs the first day and left them in the refrigerator overnight to develop. The dough was shaped and baked the second day.

Here are slices of fruit-filled ciabatta and multi-grain. Everything was so delicious! The classes we took were exceptional. We wish we had signed up for more!